With my first year of university experience under my belt I took a well needed summer back at home; catching up with family and friends and enjoying some relaxation time. I got back to university in October for the trusty old freshers week and of course infamous bar crawl, all be it take two with far more wisdomous heads on our shoulders!
My second year at uni was one I thought I would know how I felt about but even when the time came to begin all I knew was I was finally doing what I wanted (no more printing mess). I could not wait to produce my first hand woven cloth.
I took off into what De Montfort University's textile department call the 'technical block' or better known as 'bootcamp' where I learnt from scratch how to do even the most basic things all over again but in completely new ways. For example, forming a sketch book; weave structures and yarn selections needed to be gathered from a specific way of working that wasn't taught in other pathways.
It appeared I had taken on a challenge and a half to say the least. Upon catching up with other pathway students I was told I was mad to take weave.
They weren't wrong; it got more complicated. I remember my first few lectures on weave technicalities and going heeeelp. All of this is just words and black and white squares that mean nothing at all. Little was I to know this would be the case regularly but I've realised you can never fully learn everything, weave especially. You continue to learn with every experience and project undertaken, my tutors are still learning themselves!
My first woven project, taking these new skills into practical form was 'Flora Wilderness'. It was based on the concept of florals, mine being hedgerows florals & herbaceous border type gardens. This project involved a black and white tonal project with only one other colour- I chose charcoal grey, pure white and dusky pink.
Only after doing this project did everything make sense and me feel that weaving didn't make me mad and it wasn't terrifying at all. It just required planning, scheduling and patience to achieve beautiful end results I was so proud of I couldn't contain myself.
Final drawings concluding my research during this project that helped inspire my woven pieces
Visualizations formed taking drawings as inspiration for proportion, colour, yarn choice and structure to show my aspirations for my first woven collection:
Weaving couldn't be done until we had set up our looms.The first step was learning to form a warp.
Unfortunately they don't come pre wound and there isn't someone who will cheaply and readily make them for you much to our disappointments. Making a warp involves three things, you, some yarn and a warp winder (after you've calculated your warp's characteristics). In order to form a warp you need to work out how many meters in length your warp is on the warp winder and therefore how many sides you need. You need to tie a knot around the starting pole when you've worked this out. All that's left to do then is to wind your yarn around the warping mill going between the directional poles at the starting and finishing ends of your warp till you have the width of warp you need. There are many more complex things to forming a warp that we learnt later on in the year; such as, raddle groups and how to chain your warp for safekeeping but I won't overwhelm you with the details of those.
Me winding a warp on one of our warping mills
Warps wound we all had a specific loom to set up with the instruction of our weave technician Rosy before moving on to create samples on each; giving us ideas of how a loom works, how to trouble shoot problems such as fixing ends (threads) and most importantly what a weave looks like.
A 16 shaft dobby loom (right) and part of the process of beaming a warp where each thread is separated and spaced out onto the raddle in its individual groups before being wound evenly (left)
There were five different drafts (the way in which the loom is set up to create a range of different effects) for this project; straight, point, textured, cramming and spacing and block in ranging warp materials from cotton and wool to rayon, silk and linen (which at such fine weight snapped left right and centre and was my first lesson into fibres; it took me four days to form a 14 inch sample!).
Here are a few of my woven pieces from this project:
Silk point draft technical weave (left) and Linen cramming and spacing technical weave (right)

 Textured wool, straight draft technical weave (left) and block draft striping rayon draft technical weave
Cotton and wool cramming and spacing technical weave
In fitting with the brief and our research we were expected to experiment on these looms and show off our innovative sides to create final woven pieces:
Point draft woven circles inside vertical zig zags on silk warp (left) and twill woven with incorporated floats on Cotton and wool warp (right). Both woven using ombre colour manipulation
Diamond weave with textured blocks of the same diamond on cotton and wool warp (right) and circular weave with lines of plain weave inbetween on linen warp; the weave that caused me horror (left)
Vertical zig zags with crammed rows of pink cotton on silk warp
My first trip to Uppingham yarns, Uppingham, Rutland was had during this project. It is what I can only describe as yarn heaven, it has all sorts of magical yarns I'd had not realised even existed. You can get silks in any colour you want, paper yarns, monofilaments, fancy yarns and the finest mohairs amongst much more. I can't help but spend a good chunk of my student grant for the term on these gems; they help bring out the best in my weaves.
My second project of second year was a double cloth project (where you work the front and the back of the cloth separately) using a fibre of your choice as long as it was space dyed. My project was called 'Collective Scattering'. My concept was derived from folds and marks seen from distorting angles, for example zoomed in and aerial view photography and the layering of imagery/objects naturally and purposefully. The target market for this project was womenswear, focusing on decorative jackets.
Mountain ranges photographed from a plane window
Greek marshland photographed from a plane window
Paper manipulation using a variety of matte paper types adding light and depth and cutting and folding techniques shapes inspired by mountain range photographs
Mark making using coloured pencil showing mountain range inspiration
Collages of marshland and farmland photography using a shiny paper, tracing paper, card and printing papers, cutting and folding additions and mark making using gouache paint, felt tip and nail polish to add to the iridescent characteristics of my photographs
A variety of artworks photoshopped together to produce a design wide in colour, shape, mark making and scale
I drew inspiration from Andreas Gursky and Raf Simmons who both work with linear lines and block shapes whether it be through the medium of painting or photography.
This project was a real eye opener as to how far you can really push your own ideas to create completely unique fabrics. Double cloth weaving opened a whole new door with me instantly working to create double sided works in a variety of patterns and colours on both sides. My colour pallet was of pink, teal, light teal, light blue, mint green and deep plum combined with an iridescent aspect throughout.
Colour selection using yarns and painted colour swatches (above)
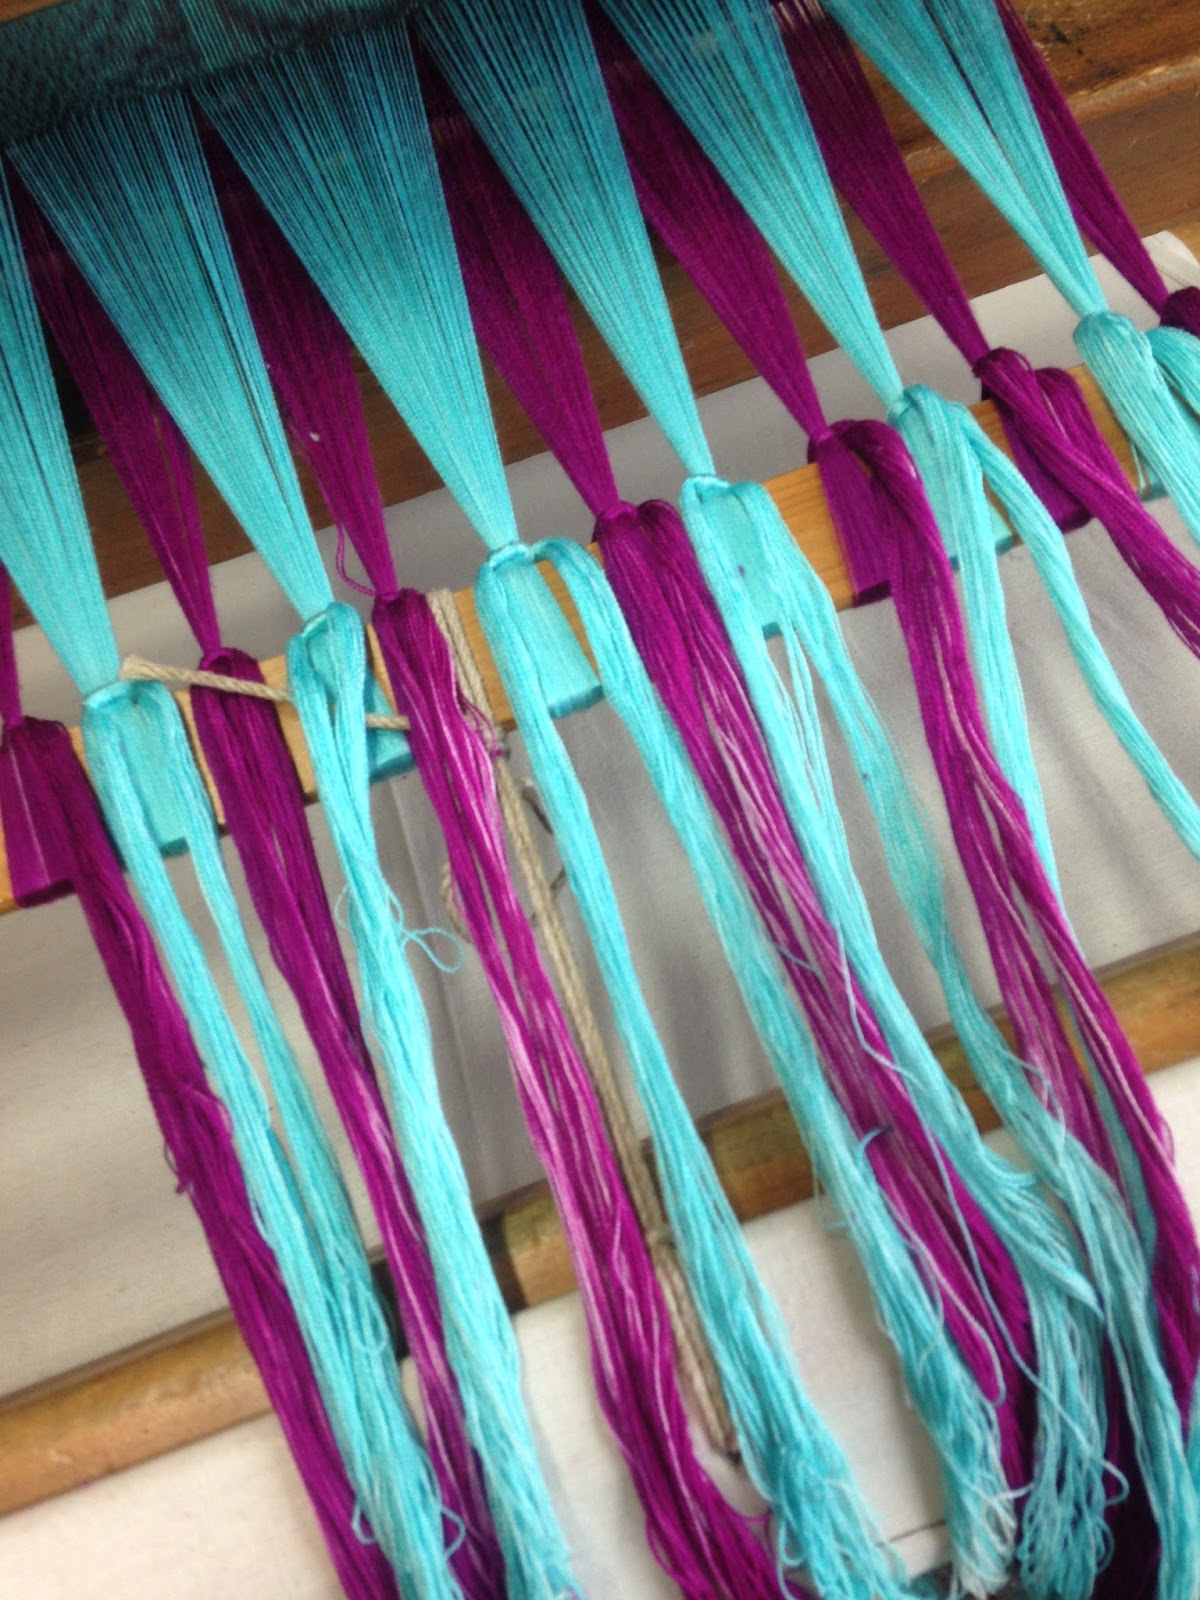
At this point I chose silk as my warping fibre for this project and then made my way to the dye lab to put those crucially learnt skills in first year to the test and form a space dyed warp.
Both top and bottom cloth (warps) set up on the loom in my space dyed pinks, purples and blues (left) and warp threads tied onto the front stick ready to weave weft into (right)
My coloured warp threads were woven using ombre striping techniques to show off the rapid change of colour seen within iridescence inspired by a shell I found at the Pitt Rivers Natural History Museum. Pleating and angular weaving were key parts of this project, picking up on the folding and distortion features of my research.
Double cloth weave notations showing how to weave a pleat using the relaxation of tension on one warp at certain points when weaving (left) and my double cloth woven piece including this notation with zig zags, the ombre and angular beating techniques (right)
Double cloth weave showing wide diamond blocking (woven by rotating through the notation in a variety of directions at set timings) and random ombreing in pastel blue, plum and neon green resulting in the forming of a blend of shades
Woven double cloth notations used to form twill structures
Zig zag weave using solid matte stripes and thin pleats (right) on an ombre part of my warp that moves from purple to blue and the reverse of the same weave showing the complete contrast with its front (left)
Another piece from this collection showing much larger pleats and block striping (left) and a close up where you can clearly see the wiggly line structure I created for this weave (right)
Jacquard weave is another part of constructed textiles I was intrigued to learn and that was included in our module. The possibilities within the Jacquard loom are endless as I was about to find out.
Below are my initial jacquard samples where I was taught about transferring and creating basic drawings by hand using a technical programme for electric weave, Scotweave.
Three colours (structures) and seven colours giving varying ranges of pattern and colour details within my samples (Left).
My final jacquard weave for this project (right) was based upon mark making from rocks I had observed at The Pitt River's Natural History Museum making for a rather textural finished fabric. My original design was repeated to add interest and usability toward my market. Colour sequences for this weave were really jazzy having chosen a complex stripe of blue and pink to match those in my dobby weaves.
This wasn't my greatest jacquard weave but its a decent first shot at creating a digitally formed fabric on a much larger scale, these improved beyond my belief as I grew to know the software, how to work with imagery, colour, patterns and other key factors.
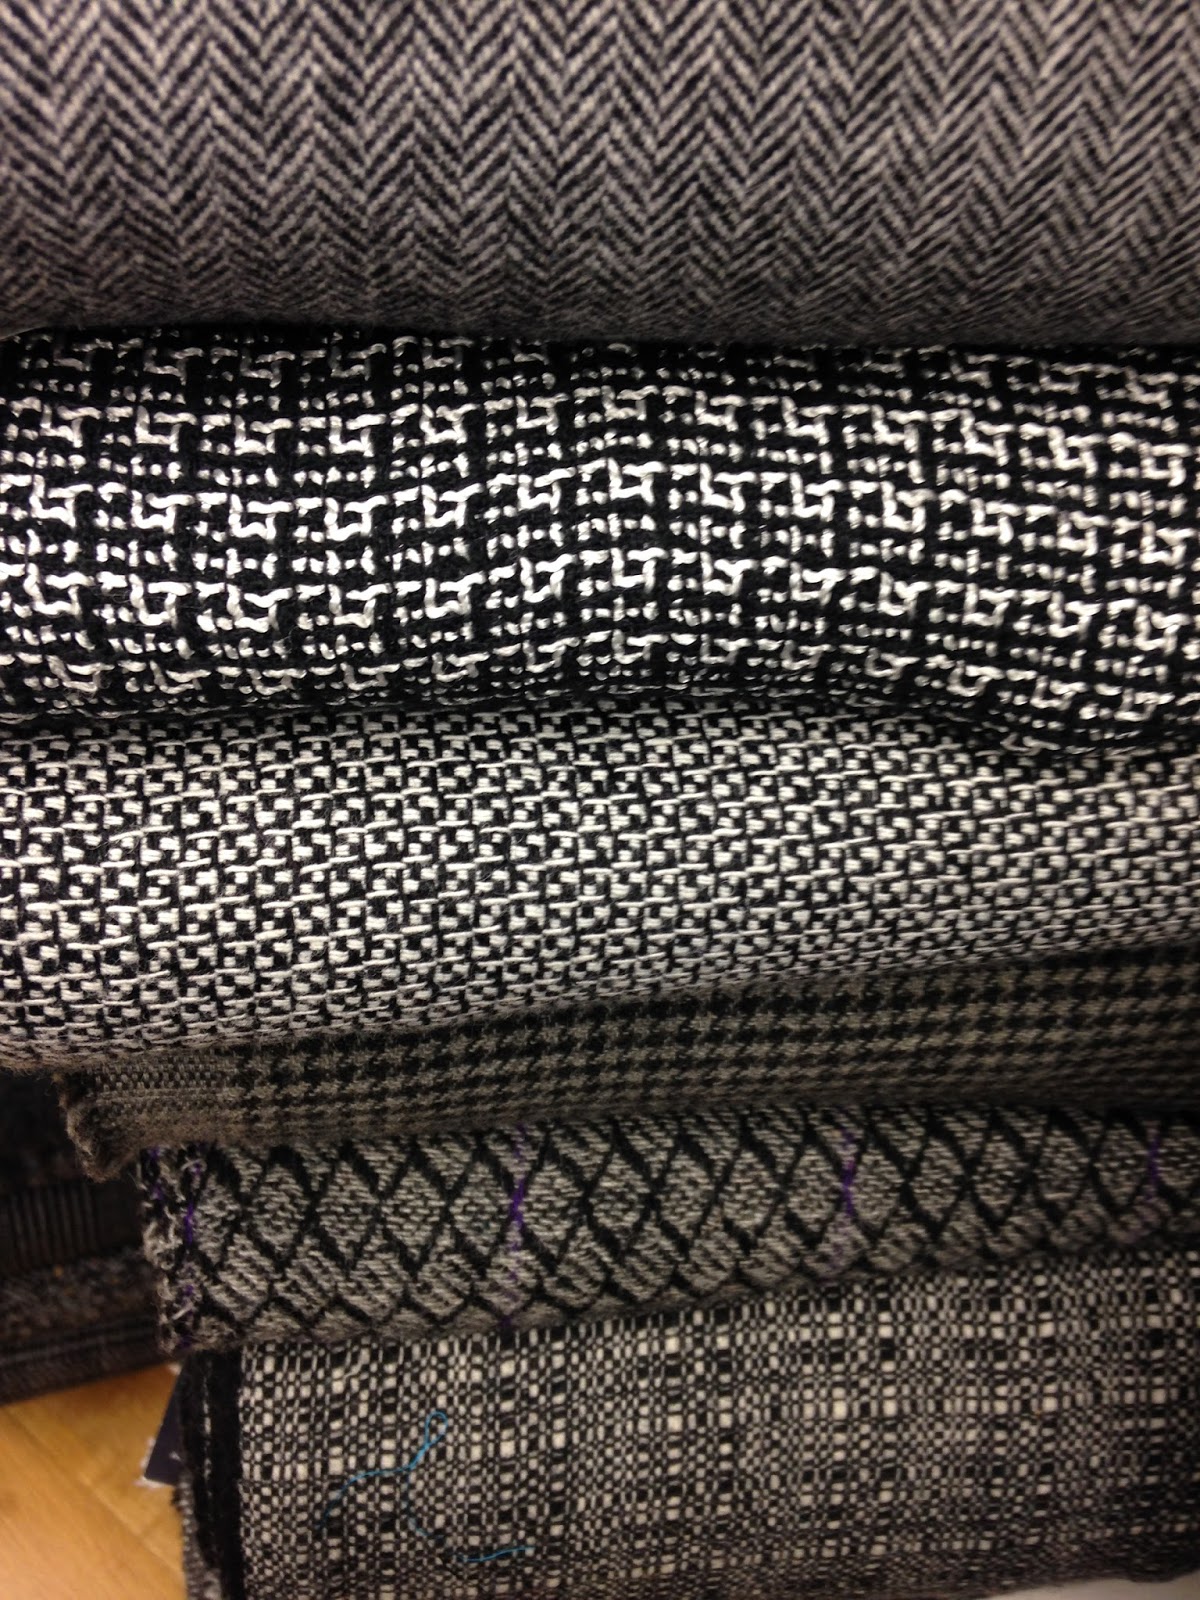
As inspiration for this project we took a trip to London's Berwick Street; widely known for its fabric and haberdashery stores. We were awe struck by some of the fabrics sold on the market. Each shop varied, some selling embellished fabrics only and others focusing on fabric for suiting only. I took this opportunity to take a closer look at weave structures, weights of fabrics (whether the fabric is thick, thin or anywhere inbetween), fabric handle (how the fabric feels) and finishes.
Fashion fabrics (left) and coat/upholstery fabrics (right)
 |
| Fashion fabrics with finishing effects |

Contextualization of one of my woven pieces from this project
Here is my final project of second year. Three design projects were the maximum achieved in second year as the process of setting up and weaving takes so long that each project was a total of 8 weeks long. My third project was called 'Shifting Imprints' and was derived from the concept of textures left behind by nature and people such as grit, cobble stones, footprints and peeling paint on buildings in both Paris, Peninne Weavers (a commission woven mill) and W. T. Johnson's Cloth Finishers Factory (mills we visited to learn more about the textiles industry). My target market was for womenswear. Colour pallet wise I picked out colours that fitted both natural and man made environments. These colours were also influenced by the chalky and brittle textures felt within my research leading me to pastel shades of green, turquoise, yellow and grey.
This project was the beginning of collection proposals and presenting our ideas to our tutors and peers via the form of Powerpoint presentations which would advance our skills in presenting to large groups of people at potential interviews and proposals in work places.
My presentation and proposal of 'Shifting Imprints'- Here is the front page showcasing an image of road alterations on a roundabout in Paris
Loose grit from broken down building and flooring materials in Paris
Cracked paving and structure formed from stone cobbled decoration of Parisian streets
An artwork inspired by the shapes of the cracked flooring seen in Paris
An etched building post on a palace in Paris (left) and an artwork inspired by its textures using tracing paper, paper scrunching and coloured pencil
Drying (left), warping (right) and wet finishing (below) machinery seen on our industry trip
Working loom showing black cloth being woven
A variety of plaid cloths finished and on the roll ready to leave W. T. Johnson's factory and be sold (left) and reeds on their shelving at Peninne Weavers ready for the next cloth that requires setting up (right)
Cracked walling showing layers of paint at W. T. Johnsons
Tire and footprint marks on the stone floors at W. T. Johnson's
Inspiration from Herve Telemagique I saw at an exhibition on Haiti at the Grand Palais in Paris who uses a mixture of painting and collage to form mark making layers in dense and plain formations
Mark making taken from cracked paint and water imprints formed from pencil crayon and pastel on tracing paper highlighting the chalky textures of my collection (above)
I was more adventurous with yarns within this project; I used 2/30 grey cotton as my warp thread and acrylic, wool, fancy boucles, crepe and varying weights of cotton as the my weft (above). These decisions were inspired by the soft textures and chalky appearance of my photography and drawings; colour being drawn as highlights.
This collection was all about trying something different and pushing myself to use research methods, woven techniques and yarns I was cautious of. I decided to really go for it and tried out collapse weaving by weaving my weft with plenty of elastic and heat shrink yarns via floats (groups of threads captured on either the front or back of the weave using a block draft). The results were amazing, I formed fabrics which had a 3D forms and were completely free manipulation translations; as of which were pulled straight from my research which contextualized how I wanted my collection to look. Pattern was pushed to the back burner within this project which was a rare for one for me.
Yarns within this project was the start of my buying from one of my favourite yarn companies, Handweavers from London; Handweavers. I brought a wide collection of fancy yarns including latex dipped mohair, paper, leather and fine cottons.
My most impressive collapse piece from this collection; once off the tension of loom the colour striping and use of elastic to form ridges within this fabric created interesting depth and shape
Another weave from the collection using paper and heat shrink yarns enhanced by ombre use of chalky colours focusing on the highlight shades of my pallet created a really soft appearance that I enjoyed using. The floats on the back of this weave made for a reversible fabric which was a feature which I was to consider in future projects
Stripped back colour and texture using paper yarns were appealing to me within this piece and really brough to me the ways I could use my blocks other than for weave notation difference
This weave was one where I tried to use a vertical zig zag; as you can see it didn't go very well as the tension formed by not using a completely stable cloth (plain weave) and using elastic which put pressure on my thin cotton warp left it very unstable and loads and loads of ends (threads) broke. This weave was a lesson learner for me in the complexities of yarn properties and adaptations needed to be made to fit them.
Jacquard weaves from within this project were inspired by the Parisian cobbles seen above in this post. I found the outlines of the shapes within this image created a lovely mirrored placement. I worked in a very large scale for this design and discovered my love of large scale designs like I had never done so before. Being able to capture detail and shape in ways that was impossible on the dobby looms was something I loved to be able to explore.
Second year was the year where I really started to think about who I wanted to be as a designer and to start tailoring my skills to become specialist in my subject (woven textiles). I loved every minute of learning the basics of weaving; the challenges often faced by it captured my imagination and left me creating woven pieces that I had no idea were possible before the year began.
The skills I learnt this year were priceless to forming collections in my third year that would push my use of yarns and notations to fit to more exciting markets and audiences that would form collections I am so proud to call my own.
Third year was looming and I was hooked!- My mind was wiring with ideas for my final project and how I could capture my skills in a fresh and innovative take that would lead to a really in-capturing collection.